
Some links in this guide are affiliate links. As an Amazon Associate, Everyday Home Gym may earn from qualifying purchases at no additional cost to you.
Most home gym guides bury flooring in a bullet point. “Oh yeah, get some rubber mats.” Then you buy the wrong thing — spend $150 on foam tiles, park your dumbbell rack on them, and watch the edges compress into little rubber lips that catch your foot during every set. Not great.
Flooring is the foundation of everything. It protects the actual floor from dropped weights and moisture, keeps heavy equipment from creeping across the room, cushions your joints during long sessions, and — if you’re above a living space — is the difference between a reasonable neighbor relationship and a very awkward one.
Getting it wrong isn’t catastrophic. But getting it right from the start costs less than fixing it later. This guide covers the different flooring types, how to choose based on your workout style and space, and specific Amazon picks for every budget.
Why Flooring Matters More Than It Seems
A few things happen without proper flooring that catch people off guard.
Equipment slides. Even a 50-pound dumbbell rack can creep across bare concrete or hardwood during workouts. Racks shift. Cardio machines walk. Rubber stops this.
Your floor takes damage. Dropped weights crack concrete, dent hardwood, and tear vinyl. A single missed deadlift on bare flooring can leave a mark you’re explaining to a landlord or home inspector years later.
Your joints pay the price. Concrete is rough on knees, ankles, and hips over time. This matters most during any jumping or running in place — but honestly, just standing on bare concrete for 45-minute lifting sessions adds up too. The right base layer makes a real difference, especially for longer sessions.
Noise and vibration transmit downward. This is the one that matters most if you’re on the second floor or above living space. The right flooring — particularly layered rubber — absorbs impact before it reaches the structure. It won’t make a bumper plate drop silent, but it helps significantly.
Good flooring is not glamorous. Nobody’s posting gym floor photos. But once it’s done right, you stop thinking about it entirely. That’s the goal.
The Three Types That Actually Work
There are three flooring types worth knowing. Everything else is either a subset of these or a product marketed to gym owners that doesn’t belong here.
1. Rubber Rolls and Stall Mats
These are large sheets of vulcanized rubber — typically 4’x6′ and 3/8″ to 3/4″ thick. The ones sold at farm supply stores for horse stalls are the same product as “premium gym flooring,” just much cheaper. Dense, nearly indestructible, and they handle everything from barbell drops to treadmills without complaint.
Best for garage gyms, basement gyms, anywhere you’re lifting heavy or doing serious barbell work.
The catch is the weight. A 4’x6′ stall mat at 3/4″ comes in around 100 lbs. Once it’s down, it’s down. They also have a strong rubber smell when new — leave them outside for a day or two before bringing them in, especially in enclosed spaces. And they come in a fixed size, so rooms with odd dimensions mean some cutting.
For farm stores: Tractor Supply, Rural King, and similar outlets usually carry these. If you don’t have a truck or a Tractor Supply nearby, Amazon has solid rubber mat options that ship to your door:
👉 Browse 3/4″ Rubber Stall Mats on Amazon
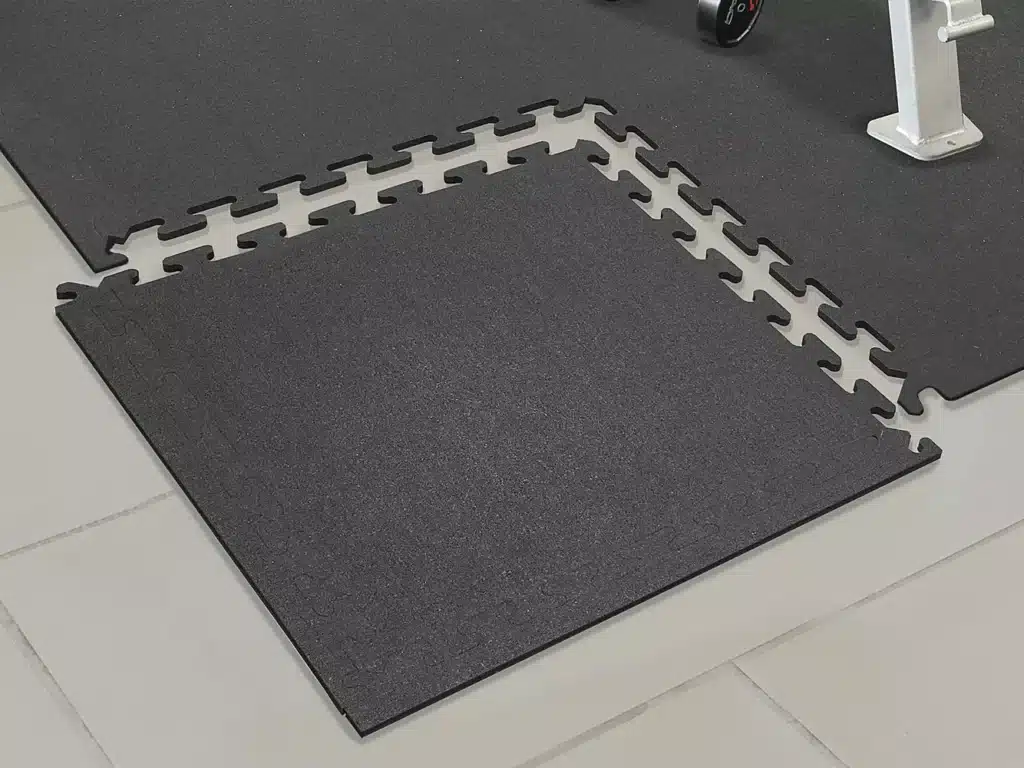
2. Interlocking Rubber Tiles
Modular 2’x2′ pieces that snap together to cover whatever square footage you need. More flexible than rolls — you can cover exactly what you need, expand the layout later, and pull them up if you move. Installation is genuinely DIY: no tools, no adhesive, most kits go down in under an hour.
Best for spare bedrooms, medium-duty garage setups, and anyone who wants to protect the floor they have without committing to a permanent installation.
The limitation is thickness. Rubber tiles typically run 1/4″ to 3/8″, which is fine for most lifting, cardio, and functional fitness work. If you’re doing regular heavy deadlifts or dropping bumper plates, add a stall mat in the barbell zone on top of the tiles. That hybrid approach — tiles as the base, stall mat where the barbell lands — is what a lot of well-thought-out home gyms use.
We did a full review of the SUPERJARE rubber-top tiles, which use an EVA foam base under a rubber surface layer — better cushioning than solid rubber at the same price. Read the full SUPERJARE tile review, or go straight to the product:
👉 SUPERJARE 12-Piece Rubber Top Tiles on Amazon
For all-rubber interlocking options:
👉 Browse Interlocking Rubber Gym Tiles on Amazon
3. Foam Tiles and Exercise Mats
EVA foam tiles are the lightest, cheapest, and easiest option. Great for yoga, stretching, bodyweight work, apartment floors, and light dumbbell sessions (staying under 30-40 lbs). You can put them down and pull them up in minutes. They’re forgiving on bare feet and joints.
They compress, though. Park a heavy dumbbell rack on foam tiles and you’ll watch the edges deform over a few weeks. This creates an uneven surface and, more practically, an unstable base for loaded squats. Foam belongs in the stretching and mobility zone. Rubber belongs where the iron lives. Use both — just don’t mix them up.
For floor work, a dedicated exercise mat placed on top of whatever base you have is better than foam tiles alone:
👉 Gaiam Essentials 10mm Exercise Mat on Amazon

Match Your Flooring to What You’re Actually Doing
Heavy Barbell Training
Squats, deadlifts, power cleans — this is the most demanding use case. You need 3/4″ rubber minimum, a rigid surface (no squish underfoot during a loaded squat), and impact resistance for the occasional missed lift. If you’re doing regular Olympic lifting with bumper plates dropping from overhead, build a deadlift platform in that zone (see the DIY platform section below) so the impact is concentrated in one spot rather than spread across your entire floor investment.
Dumbbell and Functional Fitness
Moderate impact, some equipment weight from a rack or stand. 3/8″ interlocking rubber tiles handle this well — easier to install than stall mats, lighter to ship, and they handle dumbbell racks up to a few hundred pounds without issue. Throw a stall mat section under the rack itself if you want extra protection where it counts.
Cardio Machines
Treadmills especially — the motor and belt create constant vibration that travels into floor joists. A dedicated equipment mat under each cardio machine is different from general gym tiles. It’s designed for that specific vibration pattern and is much cheaper than re-flooring. Put it on top of whatever base flooring you have.
👉 Browse Treadmill Equipment Mats on Amazon
Yoga, Stretching, and Mobility
A 6-10mm exercise mat placed on top of your base flooring is the right call here. Warmer feeling, softer for knees and wrists, easy to roll up when not in use. Keep one dedicated to floor sessions rather than relying on your tile surface.
Mixed-Use Gyms (Most People)
Some lifting, some cardio, some stretching. The practical approach: rubber tile base throughout, with a stall mat or platform in the deadlift/squat area if you’re doing serious barbell work, and an exercise mat for floor sessions. Two stall mats plus a pack of interlocking tiles covers most home gyms under 200 sq ft. It’s not complicated once you stop trying to find the one product that does everything.
Flooring by Space Type
Garage Gyms
Concrete floors, which are actually a good base — hard, flat, and moisture-tolerant when sealed. Standard approach: 3/4″ stall mats for the lifting area, interlocking rubber tiles for the cardio and open floor zones. For a 200-300 sq ft garage, that’s typically 2-4 stall mats and a couple packs of tiles.
One thing to know in humid climates: concrete slabs periodically collect moisture beneath rubber flooring. This is normal and not a problem as long as you occasionally lift the mats to let things breathe. Sealed concrete helps. If moisture is a consistent issue, a thin foam interlayer under rubber tiles creates an air channel that keeps things from getting trapped.
For the full garage gym buildout, the flooring section of our Complete Home Gym Setup Guide covers specific layout recommendations alongside the equipment choices.
Basement Gyms
Same approach as a garage, with one addition: moisture. If your basement floor isn’t reliably dry — even seasonally — deal with that at the foundation level before laying flooring, or choose flooring that tolerates some moisture without growing mold underneath. Rubber: fine. Foam tiles in a damp basement: don’t. Carpet in any gym: please don’t.
Seal the concrete before laying flooring, and run vapor barrier tape along the edges where mats meet walls. It’s a half-hour job that pays off if you ever get a wet spring.
Upstairs and Apartment Gyms
This is where flooring choices matter most and where people get it most wrong. If you’re on a second floor or above a living space, impact noise is the issue — not just for neighbors, but for your landlord’s patience.
The answer isn’t one thick mat. It’s layering. Rubber on top of foam absorbs impact at two stages: the rubber slows the initial hit, the foam absorbs the vibration before it reaches the floor. A 3/8″ rubber tile over a 1/2″ foam base does meaningfully better at noise isolation than either alone.
That said: controlled lowering of all weights does more for noise than any flooring. Flooring helps. Technique helps more. Both are better than either alone.
For the apartment gym setup specifically — including flooring zone strategy for tight spaces — see the 100 sq ft home gym guide.
Spare Bedroom Gyms
Often the nicest situation for flooring. Existing wood or vinyl subfloor, decent climate control, defined walls. The main concerns: protecting the existing floor from metal equipment feet (especially hardwood or luxury vinyl) and managing noise for downstairs rooms.
Interlocking rubber tiles are the most practical here. No adhesive needed, easy to remove if you ever want to restore the room, available in a range of thicknesses. Cover the full floor area, not just the equipment footprint — gaps between tiles and walls become dust traps and trip hazards during workouts.
Thickness: How Much Do You Actually Need?
| Thickness | Best For | Not Ideal For |
|---|---|---|
| 1/4″ (6mm) | Yoga, stretching, light cardio | Any equipment weight, barbell work |
| 3/8″ (10mm) | Dumbbells up to ~80 lbs, treadmills, bikes | Heavy barbell training, bumper plate drops |
| 1/2″ (12mm) | Most home gyms, mixed use, moderate lifting | Regular Olympic lifting drops from height |
| 3/4″ (19mm) | Heavy barbell work, power racks, deadlift zones | Portability — 100 lbs per sheet |
The 3/8″ to 1/2″ range handles the majority of home gym setups. 3/4″ is for serious barbell gyms or Olympic lifting. If you’re unsure, 3/8″ interlocking tiles plus a stall mat under the rack is the reliable middle-ground answer.
Top Amazon Picks (2026)
Best for Garage Gyms: BalanceFrom Thick Rubber Mats
The BalanceFrom rubber mat line is the closest to the farm-store stall mat experience you can get without a truck — same dense vulcanized construction, same durability, ships to your door. The 3/4″ thickness handles rack footprints, barbell drops, and heavy equipment without deflection. If you’re converting a garage and want to lay the floor down once and not think about it again, this is the move.
👉 BalanceFrom Rubber Gym Flooring on Amazon
Best Interlocking Tile Set: SUPERJARE Rubber Top Exercise Mats
We did a full review — the EVA foam base plus rubber top layer gives you better cushioning than all-rubber tiles at the same price. The 0.56″ (14mm) total thickness is solid for dumbbell zones and cardio equipment. Covers 48 sq ft per set, easy to expand.
Full review: SUPERJARE Rubber Top Mats Review
👉 SUPERJARE 12-Piece Rubber Top Tiles on Amazon
Best for Apartments / Small Spaces: ProSourceFit Puzzle Exercise Mat
Lighter, thinner, easier to cut to size than rubber tiles. We reviewed these too — good for light dumbbell work, yoga, and stretching zones. Not the right call under heavy equipment, but for apartment gyms where the weights stay under 50 lbs they’re practical and easy to store when not in use.
Full review: ProSourceFit Puzzle Mat Review
👉 ProSourceFit Puzzle Exercise Mat on Amazon
Best Treadmill/Equipment Mat
A dedicated treadmill mat is not the same thing as general gym flooring. It’s sized for the machine footprint and designed specifically to absorb the vibration pattern of a motor and belt — which general tiles don’t handle as well. Put it under the machine on top of your base flooring.
👉 Browse Treadmill Equipment Mats on Amazon
Best Exercise Mat for Floor Work: Gaiam Essentials 10mm
Not a flooring replacement, but a required companion for stretching, yoga, core work, and anything else done on the ground. The 10mm thickness is noticeably better than standard 6mm for hip bones and wrists during extended floor sessions. Comes with a carry strap, rolls up small.
👉 Gaiam Essentials 10mm Exercise Mat on Amazon
How to Build a DIY Deadlift Platform
If you’re doing regular barbell deadlifts or any Olympic lifting, a dedicated platform is worth building. It concentrates all your floor protection in one zone, saves money on full-room 3/4″ coverage, and defines your lifting space in a way that feels intentional.
The classic home gym deadlift platform uses three materials: two 4’x6′ rubber stall mats for the outer wings (where the plates land), two stacked sheets of 3/4″ plywood for the center section (where you stand), and a thin rubber or vinyl surface over the plywood for grip. Total footprint: typically 8’x8′, which fits under a standard power rack.
Total build cost is under $200 for the mats and lumber combined if you source the plywood locally. The plywood stiffens the platform against deflection and gives you a flat, hard surface to drive from during heavy pulls. The rubber wings absorb impact when plates land — including the ones that don’t land quite where you planned.
If you’re pairing this with a power rack build, our Best Home Gym Equipment for Strength & Conditioning guide covers the rack and barbell selections that work alongside it.
Installation Tips Worth Knowing
Off-gas before installing. Fresh rubber mats have a strong smell. Leave them outside in the sun for a day or two. This matters most for basement gyms or any space without good airflow.
Start from the center. For interlocking tiles, starting in the middle and working outward produces a symmetrical layout with even edge cuts at the walls. Starting from a wall usually results in one edge that’s fine and one that’s a sliver.
Measure for door swings and vents. The most common installation mistake is laying everything down, then realizing you’ve covered a floor vent or the door won’t open properly. Mark those before you start.
Don’t glue it unless you have to. Rubber flooring holds in place with its own weight. Gluing makes future removal much harder and can damage what’s underneath. If the edges lift or the tiles creep, perimeter tape or double-sided mat tape around the border is all you need.
Leave a 1/4″ gap at walls. Rubber expands slightly in heat. In unconditioned garages during summer, this gap prevents the flooring from buckling upward along the wall edges.
Common Mistakes
Foam tiles under heavy equipment. The most common and most avoidable. Foam is for yoga and light work. Park a 300-lb dumbbell rack on foam tiles and you’ve already started compressing the edges and creating an uneven surface.
Not covering enough area. People buy just enough mats for the equipment footprint, then spend every workout stepping on and off the rubber edge. Cover the full zone where you’re moving, not just where the equipment sits.
Skipping the equipment mat under cardio machines. General gym tiles don’t handle treadmill vibration well. A dedicated mat under the machine is cheap and makes a meaningful difference for both noise and floor longevity.
Ignoring existing floor condition. Cracked or uneven concrete underneath rubber doesn’t get fixed by the rubber — it transmits through. If there are significant cracks or moisture issues, address those first.
Quick Reference: Flooring by Gym Type
| Gym Type | Base Flooring | Lifting Zone | Floor Work |
|---|---|---|---|
| Apartment / Small Space | 3/8″ rubber tiles or foam | Rubber tiles over foam base | 10mm exercise mat on top |
| Spare Bedroom | 3/8″–1/2″ interlocking rubber tiles | Add stall mat if barbell work planned | Dedicated exercise mat |
| Garage (light–moderate lifting) | 3/8″ rubber tiles throughout | 3/4″ stall mat in rack zone | Exercise mat in corner |
| Garage (heavy barbell / Olympic) | 3/4″ stall mats or rolls throughout | DIY deadlift platform | Exercise mat |
| Basement Gym | 3/8″ rubber tiles on sealed concrete | 3/4″ stall mat or platform in lifting zone | Exercise mat |
Common Questions
Do I need special flooring if I’m just doing cardio?
For a walking pad or light bike on hardwood or vinyl, at minimum get a dedicated equipment mat under the machine. It protects the floor and cuts vibration transmission. For a treadmill doing real running, rubber flooring plus an equipment mat is worth it.
Can I use regular carpet for a home gym?
Not as your primary surface. Carpet collects rubber debris, chalk, and sweat, is hard to keep clean in a workout space, and gives you an unstable surface for loaded lifting. If you’re starting on carpet temporarily — which happens — put a rubber mat over it in the exercise zone and move to proper flooring when the budget allows.
How much flooring do I need?
Measure the full workout zone — the area where you’re moving, not just where equipment sits. For a spare bedroom gym, 10’x10′ (100 sq ft) is a reasonable starting point. For a single-car garage, 12’x16′ (192 sq ft) is more realistic. Add 10% for cuts and waste when calculating. Most flooring sells in square footage, so the math is straightforward once you have measurements.
Will rubber flooring damage my hardwood underneath?
Standard rubber flooring doesn’t damage hardwood in normal use. Some rubber compounds can stain lighter wood finishes if left in place for years without moving. A thin foam or felt interlayer between rubber tiles and hardwood solves this entirely. If you’re on hardwood and think you might remove the flooring someday, use that interlayer — it’s a $20 fix for a potential refinishing cost later.
Is horse stall mat the same as gym flooring?
Essentially yes. Both are vulcanized rubber, both are typically 3/4″ thick, both last for decades under heavy use. The “gym” branded version costs more and sometimes comes in smaller pieces. The stall mat costs less per square foot but requires transportation if buying in-store — they don’t ship cheaply due to weight. Performance is nearly identical. If you have access to a farm supply store and a vehicle with cargo space, the stall mat is the better deal. If not, the Amazon gym mat options work just as well.
The Short Version
Flooring isn’t complicated once you stop looking for one product that does everything. Heavy barbell work needs 3/4″ rubber. Dumbbell and functional training is well served by 3/8″–1/2″ interlocking tiles. Cardio equipment gets its own machine mat. Floor work gets a dedicated exercise mat on top. Use rubber where iron lives, foam where bodies rest.
The practical starting kit for most home gyms: a set of SUPERJARE rubber-top tiles for the main floor, a stall mat in the rack zone if you’re doing barbell work, and a Gaiam 10mm mat for stretching. That covers the majority of setups and you’ll be comfortable with the result.
Once the floor is sorted, the rest of your build is equipment. If you haven’t figured that out yet, start with the Essential Home Gym Equipment Guide for a goal-based starting point, or browse the Strength & Conditioning Equipment Guide for specific picks at every budget level.